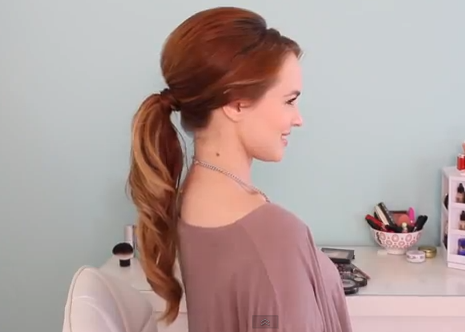
When it comes to long hair, a ponytail can you be your saviour, particularly when you are having a bad hair day or just can’t think of what to do with your hair.

I’ve always loved a slight retro twist when it comes to ponytails, so here’s a great tutorial on how you can achieve this look.

Simply follow the steps and you’ll have your own retro ponytail in no time!

Tutorial – Retro Ponytail

  1. Split your hair down the middle, or in it’s natural part. If you have a fringe, style how you would normally.
  2. Taking your four fingers, place them against the top of your head, where your fringe is and brush all your hair back from the back of your fingers.
  3. This will create a back part. Section your hair on both sides and clip the front parts out of the way.
  4. With a teasing brush (not comb!) take a one inche section of the back part of your hair, starting from the crown. Hold the section of hair slightly forward and tease the hair, using a rocking motion with your brush – don’t tease the hair up and down, simply use the brush to tease the hair with down motions only. Take the next section of hair (one inch) and repeat.
  5. Next you want to smooth the top of your crown with the outer brush bristles, being careful not to brush out the teasing you have done. It’s up to you how much of a ‘bump’ you want, so make it look how you want. More bump, more retro!
  6. Now, take the sections of hair that you have teased and gather at the back of you your head. Push up slightly for some height and secure in place with a couple of bobby pins. Go higher than you want as it will drop slightly as well.
  7. If it doesn’t look high enough or it’s uneven, go ahead and use your teasing brush handle to pull up sections to make it look how you want.
  8. Now, take a hair elastic and two bobby pins. Put one bobby pin through the hair band on one end, and the other bobby pin on the other end, so that you have a straight line between each bobby pin.
  9. Gather all of your hair, including the front section and use the bobby pin hair band to secure in place. Put one bobby pin into the ponytail and then wrap the hair band around a few times and then secure in place with the remaining bobby pin. This will ensure that your teasing isn’t messed up.
  10. Remove the bobby pins holding your ‘bump’ in place.
  11. Grab a small section of hair from beneath the ponytail and wrap it around the hair band and secure in place with a bobby pin.
  12. Now, curl the ponytail, starting with the top layer. Curl this section upwards and the remaining sections downwards in the same direction.

The video tutorial below shows you how it’s done as well! If you have hair extensions, this is a great hairstyle for your hair.

Hair Extensions

With more than 90 colours, blends and shades to choose from, we guarantee your new look will match to your hair perfectly.

Read More

Our Work

Whether it’s volume or length you’re after, our hair extension specialists can recommend the perfect solution for your makeover.

See Our Work

Our Services

We offer more than just hair extensions. From cutting and colouring to styling, bridal and barbering.

See What We Do

Satisfied Clients

Our Pricelist

See The Full List
EUROPEAN HAIR 60cm pack of 50 – $800
EUROPEAN HAIR 50cm pack of 50 – $700
EUROPEAN HAIR 40cm pack of 50 – $600